Tuesday, August 18, 2020

Growing your Classroom Library

 5 years ago I made the switch from teaching 4th grade to Kindergarten.  I packed up my classroom library full of chapter books and non fiction books and stored them in boxes where they have sat till this summer when I started selling them off online.  Which got me to thinking about the hundreds and hundreds of dollars I spent on growing my library.  

5 years ago I took the 10 Kindergarten appropriate books I had from my collection and started to grow my classroom library for much cheaper.  I maybe spent $25 total on my Kindergarten library...$50 tops.  So how did I do it for such a cheap amount the second time?  Here are my 7 tips:


1.     Check out Garage Sales.  


        There are many teachers that have garage sales after they retire and are selling off their books.  Families with children are another great stop. You can often find books for 25 or 50 cents.


2.     Check out Online Garage Sales via Facebook


I love this option because I don’t need to leave my house.  About once a week someone is selling books for pretty cheap.  I am a member of teacher garage sale group that has some good finds of other teacher items too.  I am also a member of online garage sales in the town I live in and our neighboring towns to give me a few more options.


3.      Visit Library Book Sales


A couple times of a year libraries tend to have sales where they sell off used books for under $1.  If your town library doesn’t have one check other libraries.  I love to get hardcover books here because they tend to last longer.  Check out your local library's website for details.


4.     Become friends with retiring teachers


After my first couple of years I became friends with teachers that were in their last year of teaching.  On several occasions they just gave me boxes of books they didn’t want to save.  I also had teachers that changed grade levels that gave me some of their books.  This is a great free way to get books.


5.     Use Scholastic Book Orders in your classroom


            Here is a great way to get free and cheap new books for your room and a great way to get books  into your student's homes.  When parents purchase books through your classroom flyer, you earn bonus points to spend on books for your class library. The more parents order, the more free books you receive. The flyer even features a $1 book each month.  You can also ask Parents to donate books through Scholastic’s wish list.


6.     Visit used bookstores like Half Price Books


This is not the cheapest way to buy books, but it is an easy way to get titles you may need for cheaper prices.  I like this option because their books are organized, and it is easy to see if they have the title you are looking for.  I often used this option when I need a picture book or some chapter books for guided reading.  They also have a clearance section and sometimes you can find some good treasures there.  As a bonus, teachers get 10% off.  Half Price Books will also consider donation requests for educators.  You can find the form here.

7.    Simply Ask.

        Sometimes it pays to just ask. Your friends may have books at home they would be happy to donate. Be sure to be specific of what grade level you are looking for.   Be sure to emphasize that they should be gently used.   


What are some other ways you acquire books for your classroom library?  Leave your suggestions below.


Sunday, April 19, 2020

Simple Science Color Experiment


I love this science experiment because it combines art and science.  In this experiment will explore a chemical reaction and as a bonus they get to explore color mixing.


Materials Needed:

A Foil Tray or any shallow container
Baking Soda
White Vinegar
Food Coloring
Eye Droppers or Pipettes

Directions:

1. Fill each foil tray with baking soda.  You want to make sure the whole bottom of the tray is covered.

2. Fill small cups with vinegar and a couple of drops food coloring .

3. Then pass out the tray and the cups of colored vinegar and give each child an eye dropper and let them explore and observe.  I always tell the children to go slow so that they can observe what is happening.


4. I find the children will happily do this for 20-25 minutes.  I always stop them when the tray starts to have more vinegar than baking soda.


Saturday, March 14, 2020

March Crafts

I wanted to share two art projects we did this week.  The first were these rainbows that are are now hanging in our hallway.  I cut 1 inch by 12 inch  strips of the 6 colors of the rainbow.  Then as a class we cut each color a little shorter than the previous strip in rainbow order.  We left the red strip alone, picked up the orange strip and I modeled cutting off about an inch.  Then we picked up the yellow strip, compared it to the orange strip and then cut the yellow strip so that it was shorter than the orange and so on.  I modeled the whole thing and the kids did great.  Since the kids did the cutting every rainbow is a little different.  When everyone was done, my assistant and I went around and stapled the strips together.  Then the kids glued on cotton balls.  It was a perfect craft to review measurement and colors.


This week we did Leprechaun Directed Drawings.  First and Kinder Blue Skies has these amazing directed drawings for teachers to use and are perfect for me since I can't draw, but I can follow directions.   You can find this freebie here.  Here are a few of the examples from my class.


They did such a great job and their drawing skills have vastly improved since August.

Saturday, February 29, 2020

Read Across America Week

I love being a kindergarten teacher.  One of my favorite things is taking a break from the curriculum and doing an Author's study. March 2nd is Dr. Seuss's birthday and always lines up with Read Across America Day.  I love that this day is such a simple reminder of how important reading is.   During Read Across America Week I always pick a Dr. Seuss book for each day and then we do a dress up according to the book and do an activity to go with each book. This week I am reading the following books.


I change it up every year.  Last year I read the stories One Fish, Two Fish, Red Fish, Blue Fish and The Sleep Book.  When we read The Sleep Book we wear our pajamas and spend some time reading around the room.  

When we read One Fish, Two Fish, Red Fish, Blue Fish we wear red or blue to school and we do activities with fish.  One activity we do during math is make a goldfish counting book.  There are two options to this book.  You can either count and color the fish on each page or count and place a goldfish on each page on the book.


During Reading Centers I put out this sensory bin.  The students match the uppercase letter fish to the lowercase letter fish bowl.  You can place them in a sensory bin or have the students simply make matches. 

You can find these 2 products here in my TPT store.


Tuesday, February 25, 2020

Teacher Survival Kit

On my desk at school I have some of my favorite things.  I have this super cute mug I got at Target that holds my pens and pencils, I have a ceramic apple a student gave me and a picture from my wedding day.  But some of the most valuable things are inside my desk, my teacher survival kit.  It contains:

1.  Band Aids
At the beginning of each year I got a bag of band aids from the nurse to keep in my desk.  It cuts down on the trips to the nurses office.

2. Deodorant
I can't tell you how many times I would get to school and realize I had forgotten to put some on that morning.  Much needed life savor.

3. Water Bottle
I always have a spare in my room because at some point during the year I forget mine at home...usually it's filled and ready to go on the kitchen counter.

4. Hair Bands
For those days where it is hot or windy and you have to go to recess duty.

5. Chap Stick
You know why.

6. Nail Kit
Why do my nails always seem to break at work?

7. Mints
For coffee breath, meetings with the principal or for after lunch.  Children are honest and will tell you if your breath stinks.

8. Lotion
I live in the Midwest and dry skin is a very real thing here in the winter.

9. Hand Sanitizer
For all the germs.  Why do they always sneeze and cough on me?

10.  Disinfectant Spray
For flu season

11.  Headache Medicine
You never know when you or a colleague will need some.

What do you keep in your kit?

Thursday, February 13, 2020

Valentine's Day Crafts

When I switched to teach Kindergarten a fellow Kindergarten teacher gave me advice to do crafts and art projects that don't require a lot of prep.  So with Valentine's this week I wanted to fill my room with some art work and I did 3 art projects that involved easy prep work on my part.

For the first art project I cut out some different size hearts our of card stock and I grabbed some black paper and some pastels.  I then let the kids trace the hearts and smudge the lines with a Q tip to add a cool effect.  The kids loved using the pastels for the first time and I loved that each one was different.


The second craft we did was heart people.  I made some heart patterns for each table group on card stock and I had the kids trace the heart onto red or pink paper.  I then cut one inch strips of paper and I taught the kids how to accordion fold the arms and legs.  Most got it pretty quickly and I only had to help 2 of my students fold the arms and legs.  I then gave them googly eyes and let them put it all together.  The hands and feet are from left over punched out hearts for Valentine's Day boxes. 


Our last art project was the easiest.  This week in Bible we have been learning how Jesus loves children so this was perfect.  I took the lyrics from Jesus loves me and typed them up in word and printed them.  The students then used heart stamps, heart stickers and paper hearts to decorate.  Easy and adorable.


So there you have it.  Simple and easy Valentine's Day crafts.  What do you do in your classroom?

Friday, February 7, 2020

100th Day Book Recommendation and Writing Prompt

Last week was our 100th day of school.  One of the activities we did was read this book100 Wacky Wishes.  Each page had 100 different things that you could count and they were grouped in groups of 10 which makes it easy to count by 10's to save time and practice counting by 10.  The last page allows the kids to practice counting to 100 by 1's, 2's, 5's and 10's.


Here is a writing activity that pairs nicely with this book.  The kids can write about what they wish they had 100 of.  You can download this for free here.


Monday, January 27, 2020

Math Activities with Mini Erasers

I love the mini erasers from Target.  I often walk by the dollar spot, admire them, and walk away because I don't need anymore mini erasers and by the end of my trip to Target I have come back to the dollar spot because I have thought of a reason why I do need more mini erasers.  I recently discovered someone selling mini eraser packs on Ebay for $5.95 which I thought was crazy.  Then I had a crazier thought of buying them because they had the one set I couldn't find.  I thankfully had the self control to stop myself.  So if you are like me and have tons of mini erasers here are some math activities you can do with them.


1. Count
This is the simplest thing.  Have the kids practice counting.  At the beginning of the year after we have gone over numbers 1-10 I have the kids count out erasers for 1-10.  I give them a Ziploc bag marked 1 and the have to put one eraser in the bag.  Then they get a back that is labeled 2 and they have to collect two erasers, etc.  It's an easy way to assess that they understand that the last number counted tell the total number in the group and allows me to see if they can up up to 10 objects in a fun way.

2. Ten Frames
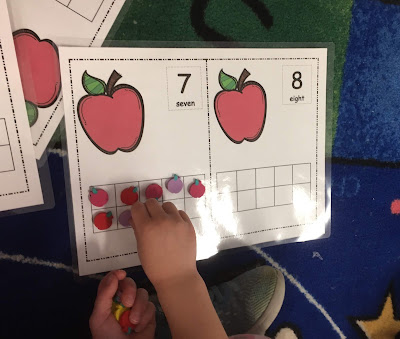
I find 10 frames can be so boring for my kids, but they stop being boring when they get to fill them with mini erasers.  They love that new ten frames and mini erasers are put out every month.  I use these as a center in my room.  You can find some ten frames here in my TPT store.


3. Sort

Another easy idea that doesn't involve prep is to have the kids sort them.  Give them 2, 3 or 4 sets of different erasers mixed together and let them sort them.

4. Patterns

Grab some sets of erasers and let them make AB, ABBA, ABC patterns etc.


5. Roll to 20, 50 or 100 Game

This is my classes favorite this year.  It is their go to game when we do math centers.  This game is a partner game though it can be played individually.  Each partner gets a board and a die.  They then take turns rolling the die and filling their board with the correct number of mini erasers.  First one to fill their board wins.  If you are short on time the player with the most erasers wins.  You can find Roll to 20, 50 & 100 Games here.


6. Adding

7. Add to 10
These fun math activity task cards are not only common core aligned but involve mini erasers and an expo markers, the two things that always make for a top choice activity in my room.
This activity is kid tested and teacher approved and is a great way for kids to practice finding how many more to ten by using mini erasers and then writing the equation or the answer.  You can find this snowman one and 11 other themes here at my TPT store.

8. Measure
Use mini erasers as a non standard form of measurement.

9. Graphing

Place some mini erasers in a bag and let the students graph and discover which eraser they had the most of.  You can find this free graph sheet here.


Friday, January 24, 2020

Book Recommendation

This week's theme in my classroom was snow.  We read fiction books in the morning like The Snow Globe Family and The Perfect Snowman and in the afternoon we read non-fiction books about snow and winter. 

My absolute favorite was The Story of Snow: The Science of Winter's Wonder by Jon Nelson.  It is this amazing book full of pictures of real snowflakes and facts about how snowflakes form.  You can find it here on Amazon.


My kids were in awe of this book.  The pictures are amazing and it is full of fascinating facts.  I highly recommend adding it to your library.  I can see Kindergartners through 3rd graders loving it.

Wednesday, January 22, 2020

An Easy Sight Word Center

One of my go to centers is this Roll a Word Center.  It is one of my kids favorite centers and they never get tired of it.  Every couple weeks I change the dice to add our newest sight words and put it back in our center bin.  The kids know what to do so I don't have to spend time explaining how to play.  I also love it because it also has a graphing component to it as well. 


The directions are simple.  The students roll the dice and color in a box above the word they rolled.  They keep rolling and graphing until one word gets all the way to the top. Whichever word reaches the top first is the winner and the center is over.  You may need to watch this center out of the corner of your eye.  (There is always one kid that rolls 3 or 4 times and then just colors their favorite word all the way to the top.)  The roll a word sheet was made in Microsoft Word.  I simply created a table and wrote in the sight words I wanted.   Once you have the template it is super easy to change out the words and reprint them with little prep.


I purchased write these dice with my scholastic book club points.  You can also find the dice at Dollar Tree (though they will barely last the year) or here on Amazon.  I recommend writing on them with permanent marker as the expo markers come off with all the rolling.  You can easily remove the permanent marker by drawing over it with an expo marker and then rubbing it off with a paper towel.  It will make the dice a little smudgy but it is worth it.

What sight word activities do you do in you classroom?

Tuesday, January 7, 2020

Adding to 10 with Dr. Seuss

My first unit of the new year is Addition and Subtraction.  I once saw a teacher that combined literacy and math with the reading aloud of a book to introduce a concept or to tie in with a lesson and I love it.  I now try to incorporate as many math picture books as I can during the year.  So for this day I used the story One Fish, Two Fish, Red Fish, Blue Fish by Dr. Seuss.


We then practiced adding to ten by coloring fish in a bowl.  We start off by coloring some red and the rest are colored blue.  We then created an addition sentence to go with it.  I love this activity because it includes reading, coloring, cutting, gluing and addition.  It also makes for some great art work in the classroom.


This craftivity is great for an addition unit or to go with Read Across America Week.  This example is for adding to ten but there is also an option to add how many fish you want into the bowl.

Be sure to check it out here in my TPT store.